> ## Documentation Index
> Fetch the complete documentation index at: https://docs.chkk.io/llms.txt
> Use this file to discover all available pages before exploring further.
# Quickstart Upgrade Agent
> Get started in minutes with Upgrade Agent. Runs locally in Cursor and Claude Code. Free to use.
export const cursorDeeplink = "cursor://anysphere.cursor-deeplink/mcp/install?name=Chkk%20Upgrade%20Context%20MCP&config=eyJjb21tYW5kIjoiZG9ja2VyIHJ1biAtaSAtLXJtIC1lIENIS0tfQUNDRVNTX1RPS0VOIHB1YmxpYy5lY3IuYXdzL2Noa2svY2hray1tY3AtdXBncmFkZS1jb250ZXh0OmxhdGVzdCIsImVudiI6eyJDSEtLX0FDQ0VTU19UT0tFTiI6IjxBREQgVE9LRU4%252BIn19";
Chkk **Upgrade Agent** connects Chkk **Upgrade Plans** to your **MCP-compatible AI coding agent** (e.g., Cursor, Claude Code),
turning approved plans into environment-aware diffs and precise edits to your IaC (Helm/Kustomize/Jsonnet/Terraform).
The agent changes only what's required, preserves your customizations, and produces a focused PR you can review,
validate, and merge with confidence.
## Prerequisites
1. [Install Docker](https://docs.docker.com/get-docker/): Required to run the Chkk-Upgrade-Context-MCP Server.
2. [Install Cursor](/resources/installation-guides/cursor): Required to begin generating environment-aware pull requests.
Agent Responses on this page are illustrative. Exact phrasing from your AI
model may vary depending on the model, settings, and repository context.
For the best experience, it is recommended to use the **claude-4-sonnet** model with the Chkk-Upgrade-Context-MCP Server.
Run the following command to clone the sample Chkk IaC repo and open it in Cursor:
```bash theme={"dark"}
git clone git@github.com:chkk-io/upgrade-playground.git && \
cd upgrade-playground && \
cursor .
```
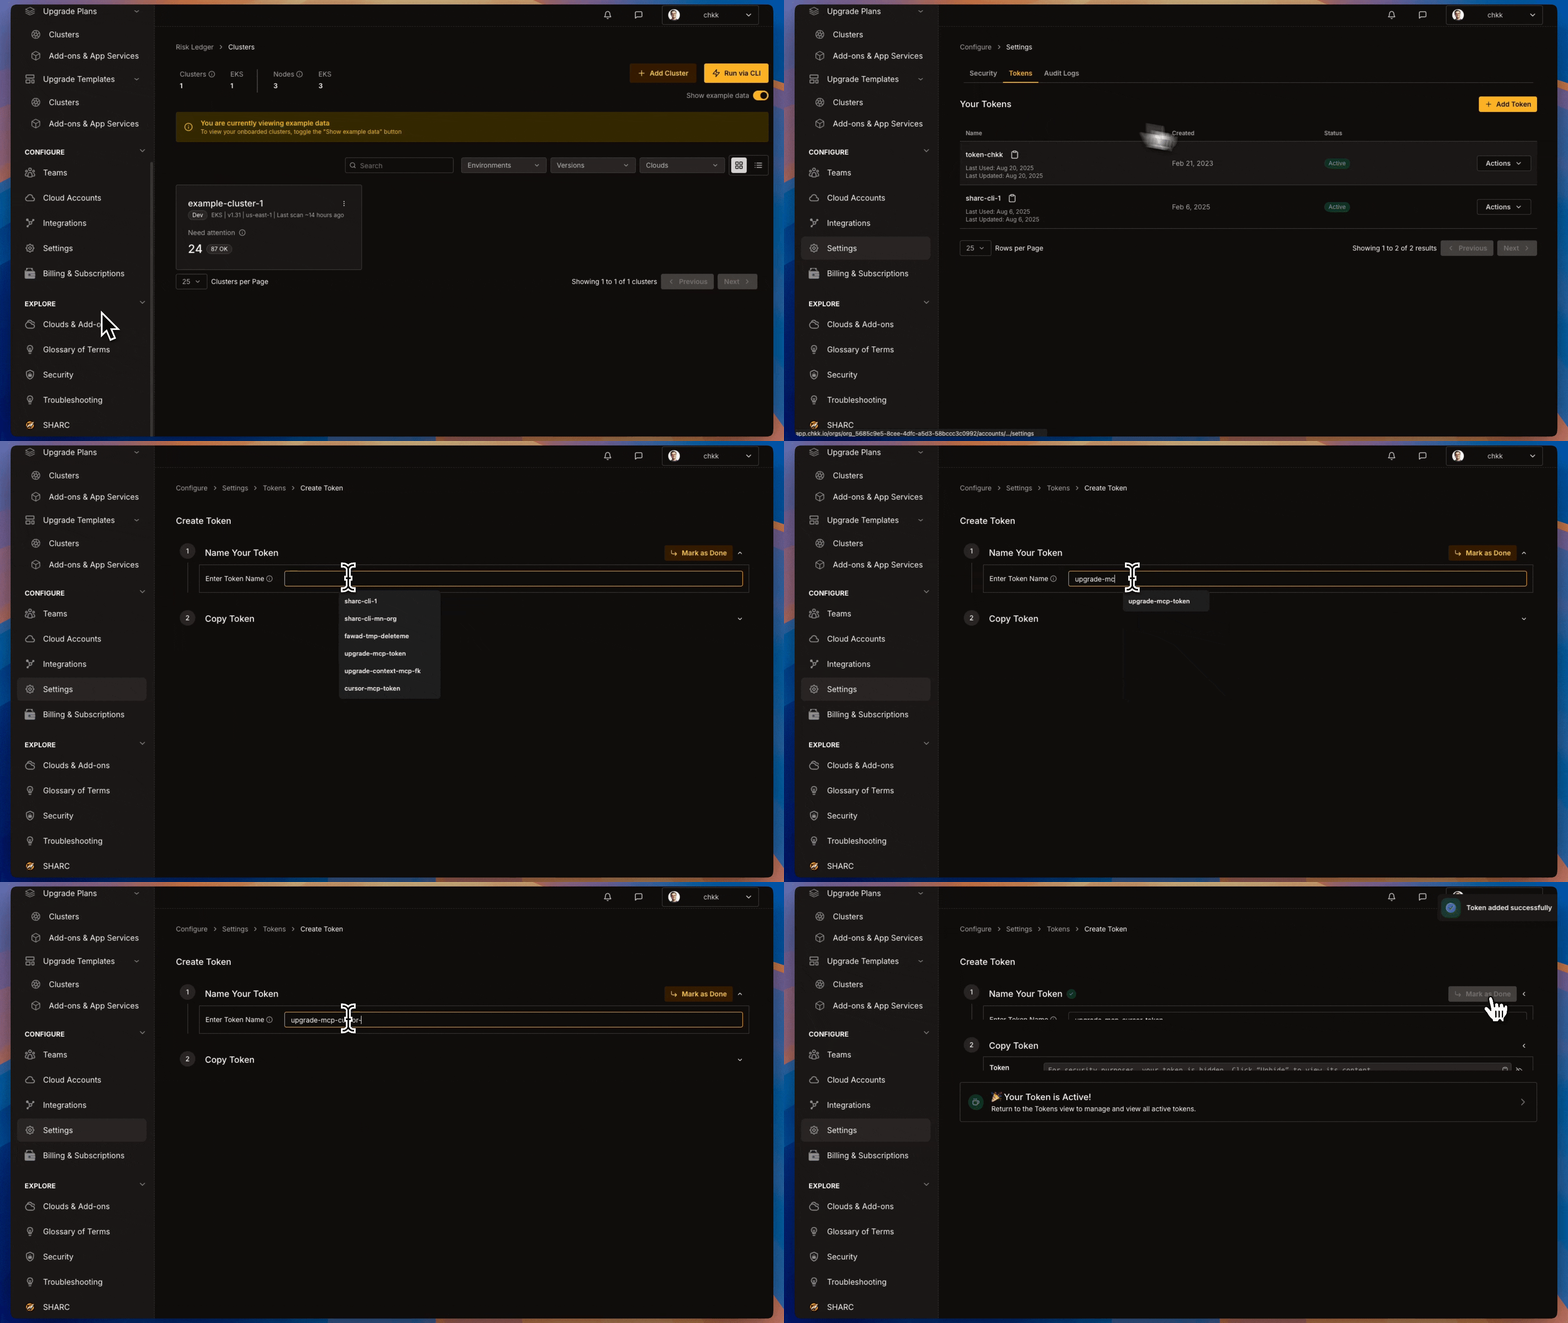
1. In the **Chkk Dashboard**, expand **Configure** on the left menu and click **Settings**.
2. Select the **Tokens** tab. Here you'll see a list of all your active tokens (if any), along with options to create new ones or revoke existing ones.
3. Click on the **clipboard** icon next to a token to copy it.
 Click the card below to install the Chkk Upgrade Context MCP Server in Cursor.
Click here to add Chkk to your Cursor
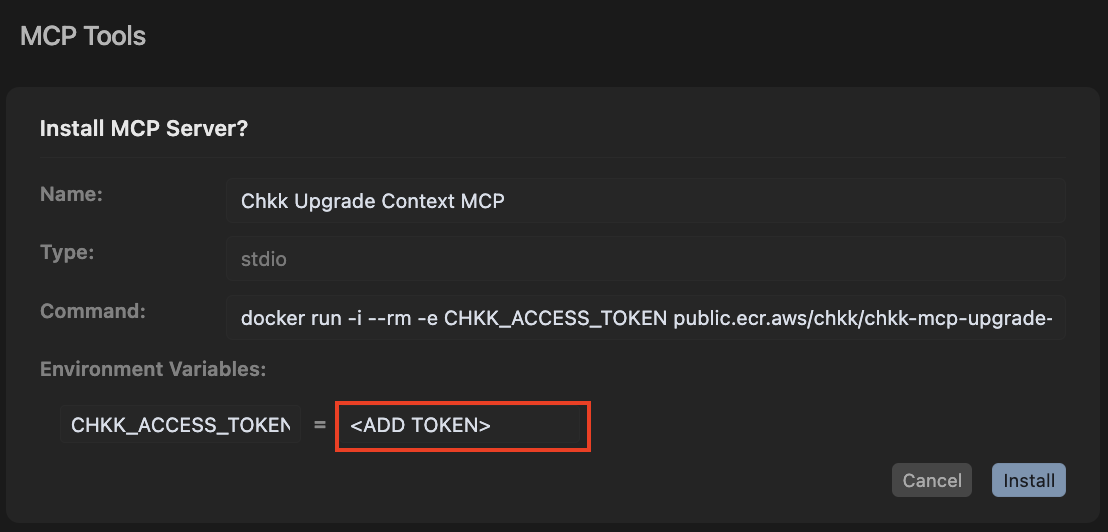
Paste your Chkk Access Token in the `CHKK_ACCESS_TOKEN` environment variable
in the **MCP Tool Settings** opened via the deeplink in the previous step.
Click the card below to install the Chkk Upgrade Context MCP Server in Cursor.
Click here to add Chkk to your Cursor
Paste your Chkk Access Token in the `CHKK_ACCESS_TOKEN` environment variable
in the **MCP Tool Settings** opened via the deeplink in the previous step.
 Verify in **MCP Tool Settings** that Chkk Upgrade Context MCP Server is
successfully installed and enabled.
Verify in **MCP Tool Settings** that Chkk Upgrade Context MCP Server is
successfully installed and enabled. 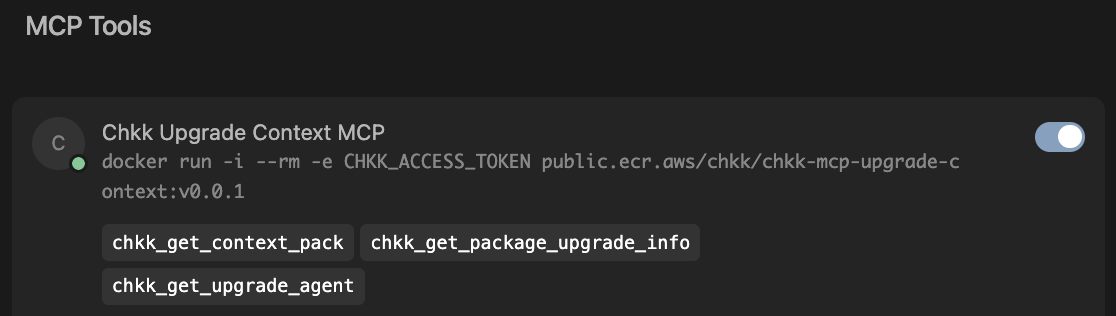 1. In the **left-hand column** of the **Chkk Dashboard**, expand **Upgrade Copilot**.
2. Under **Upgrade Plans** select **Add-on & App Services**.
1. In the **left-hand column** of the **Chkk Dashboard**, expand **Upgrade Copilot**.
2. Under **Upgrade Plans** select **Add-on & App Services**.
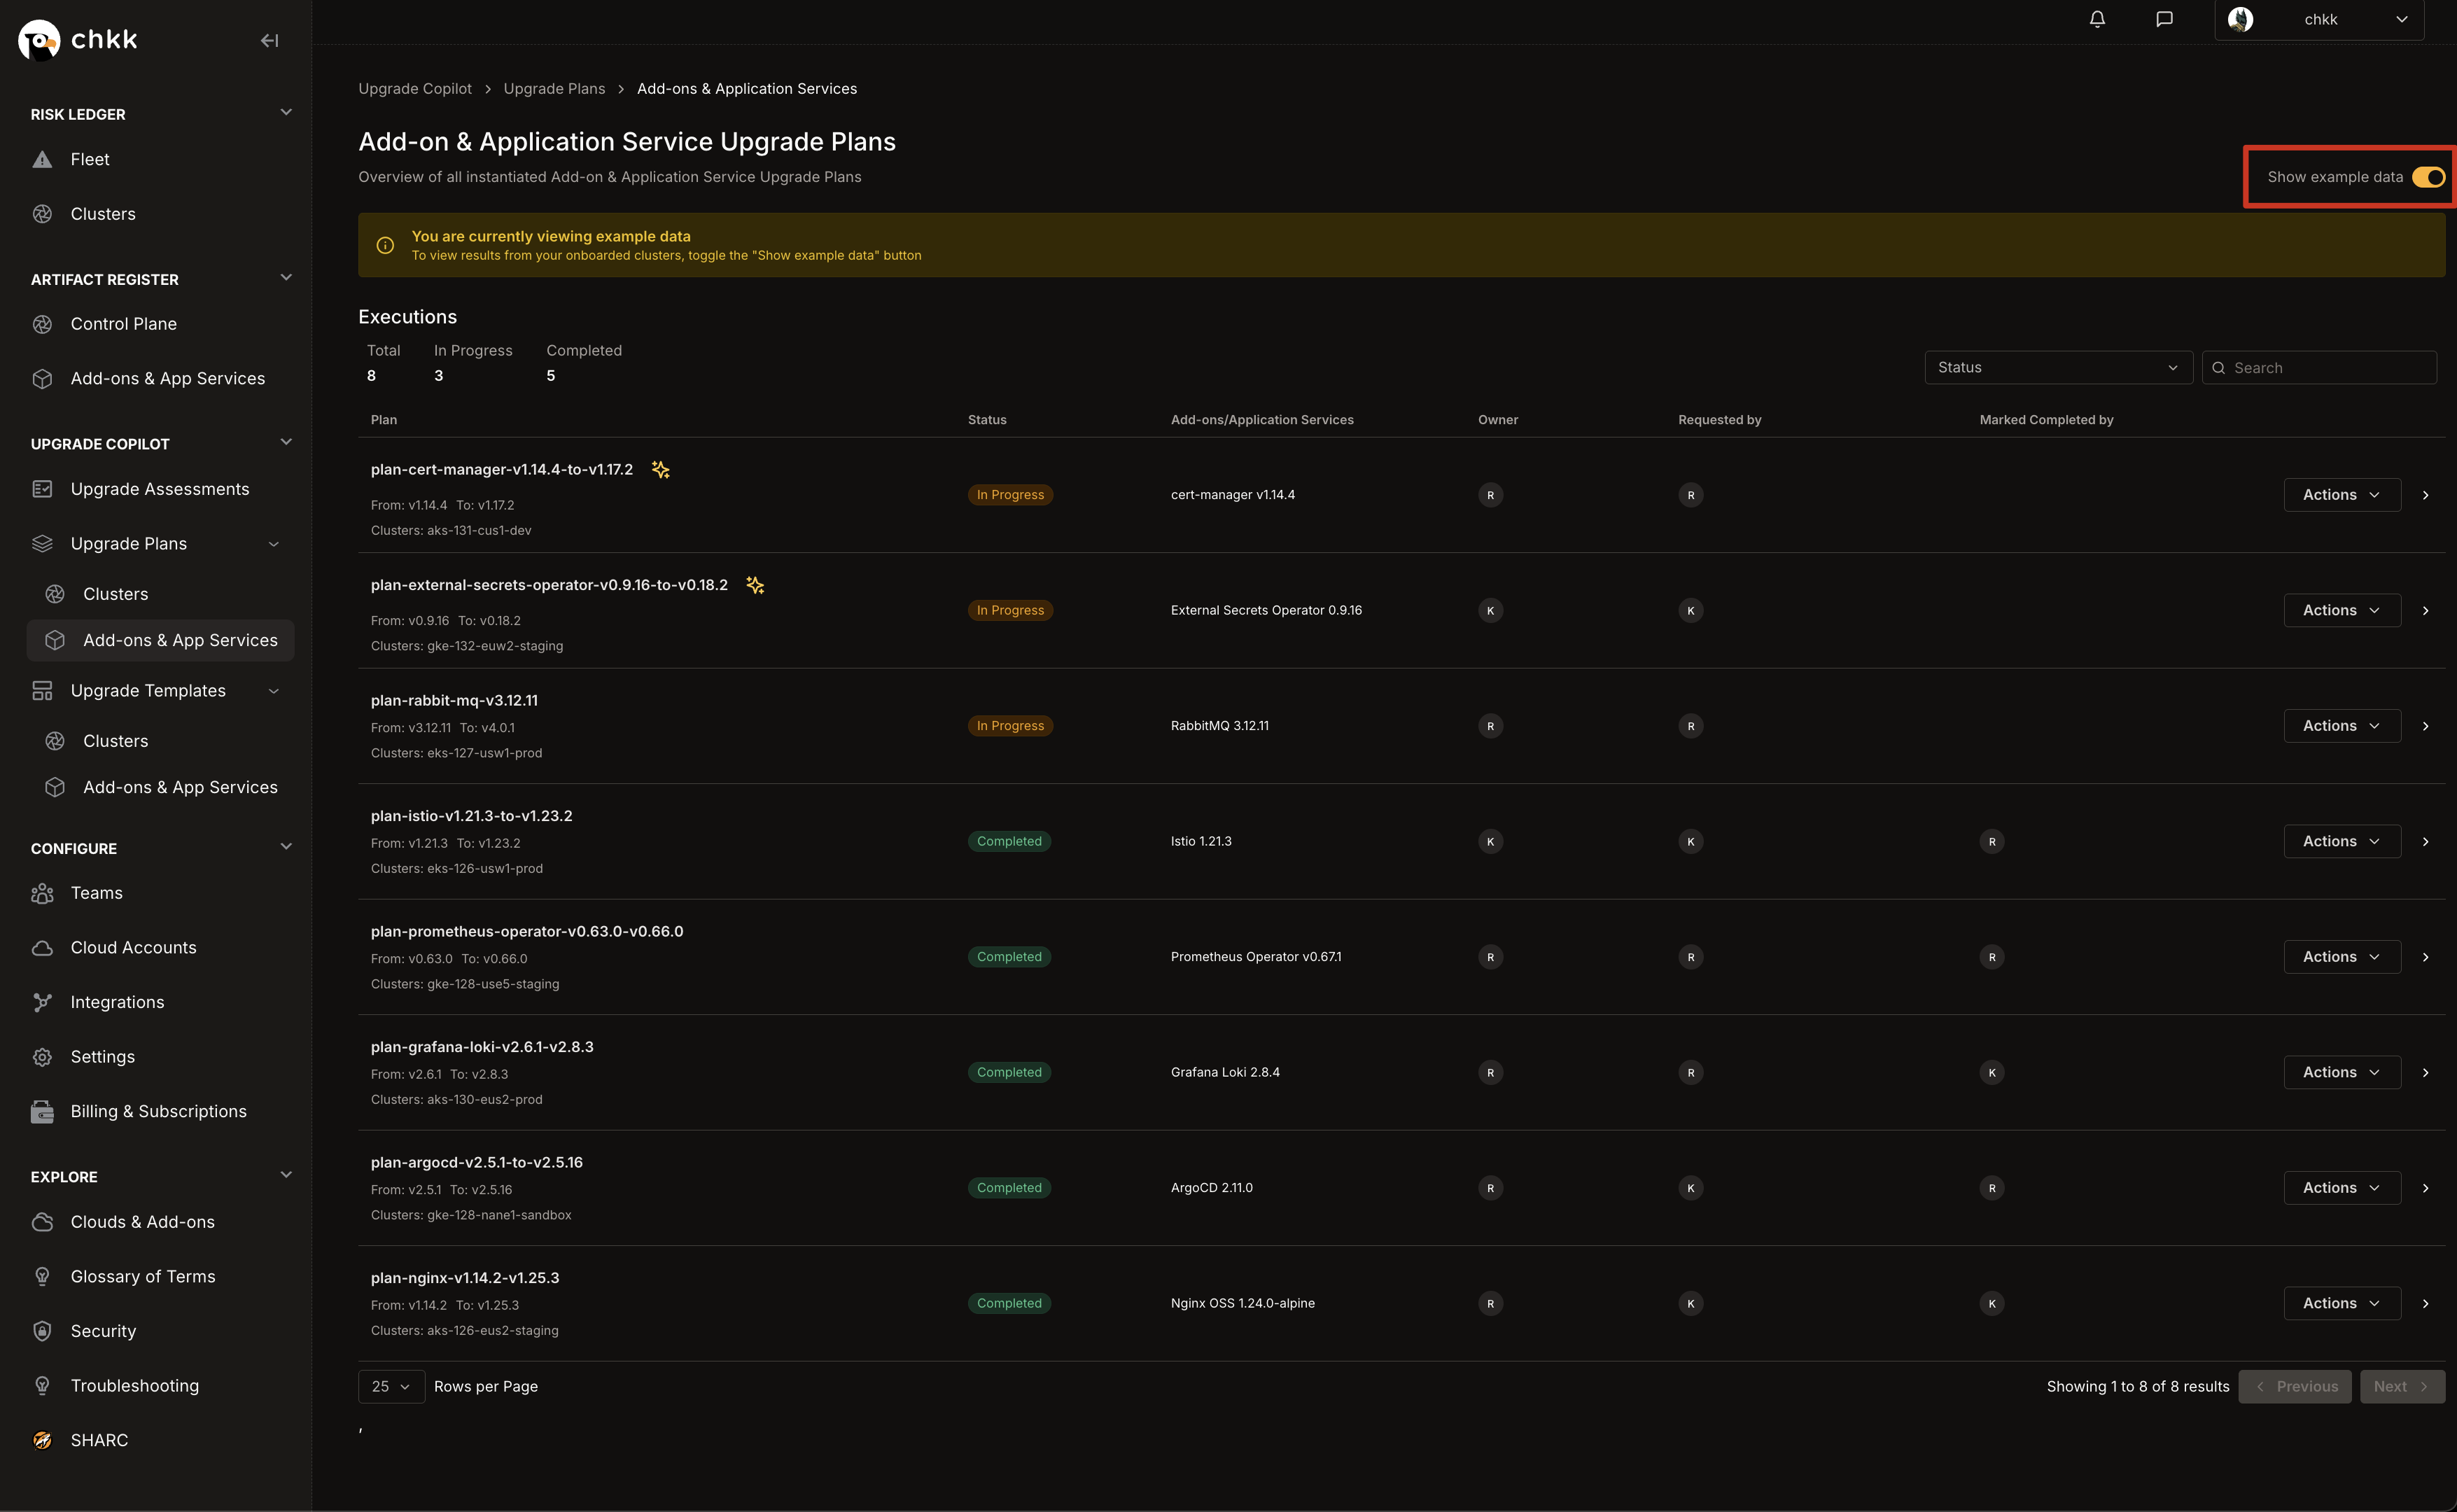
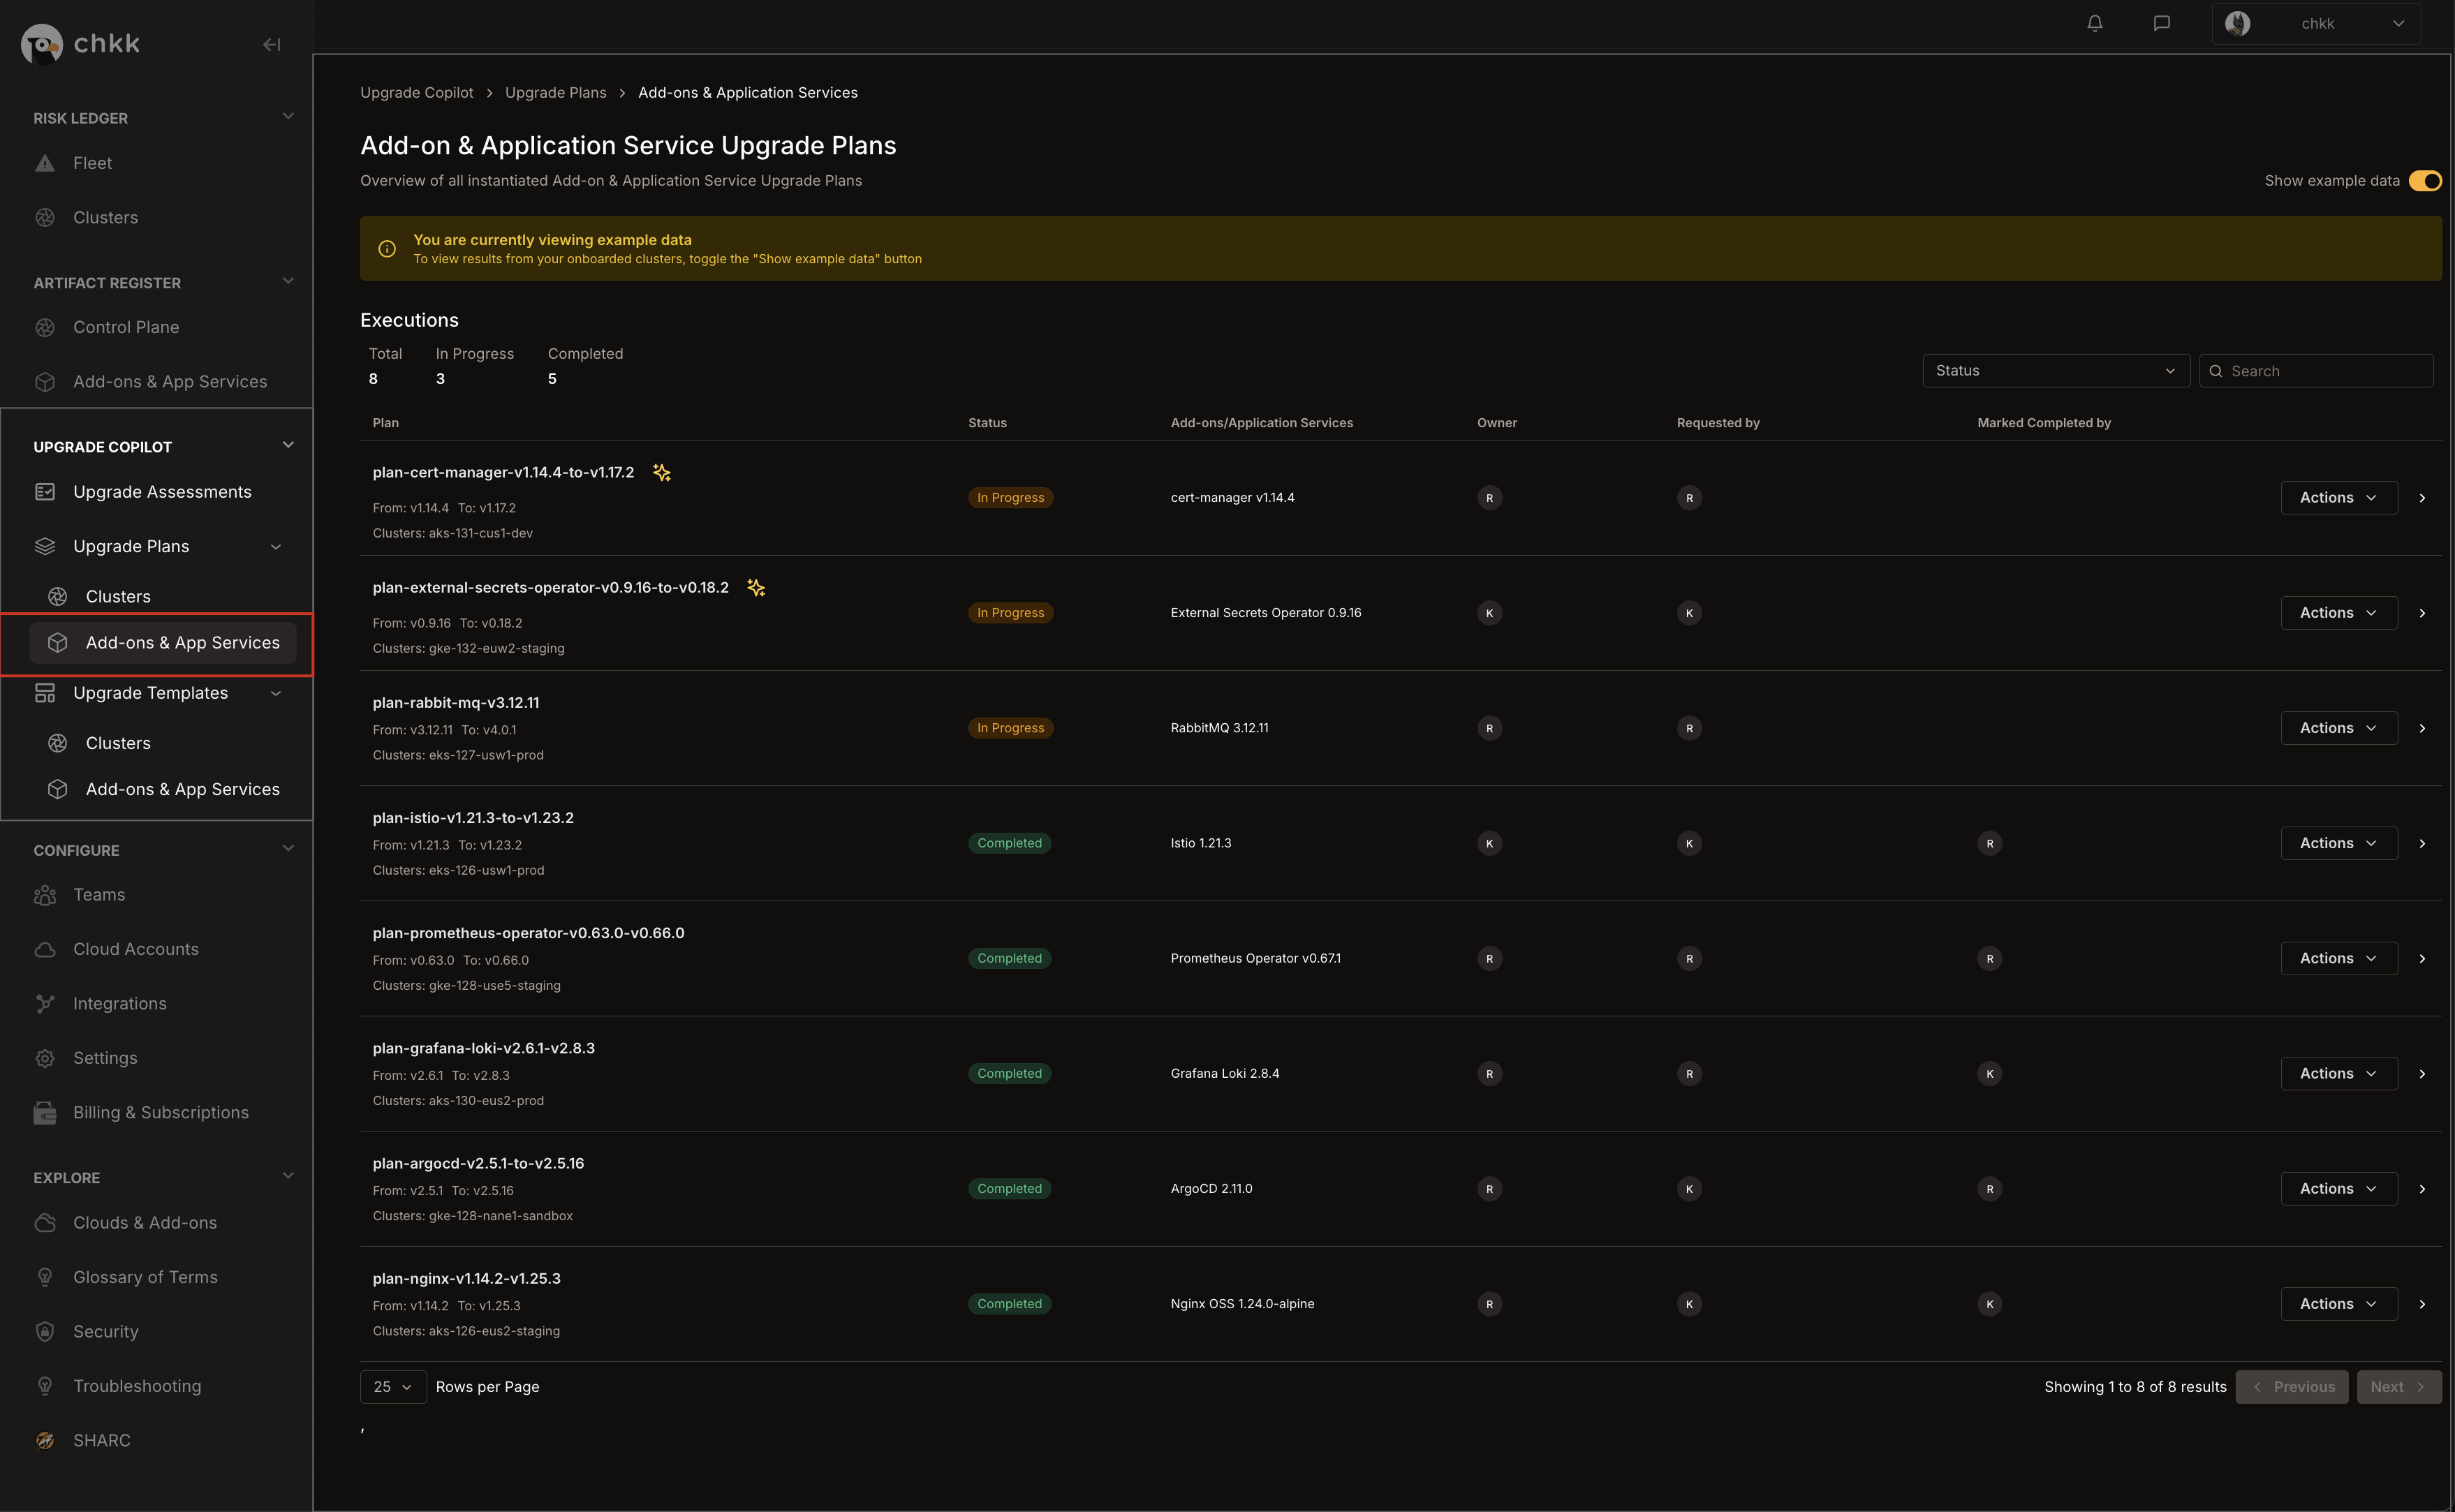 3. On the **Middle Right** corner of the page, enable the **Show Example Data** toggle, as shown in the image below.
4. This will switch the view to only show example data and displays a confirmation banner.
3. On the **Middle Right** corner of the page, enable the **Show Example Data** toggle, as shown in the image below.
4. This will switch the view to only show example data and displays a confirmation banner.
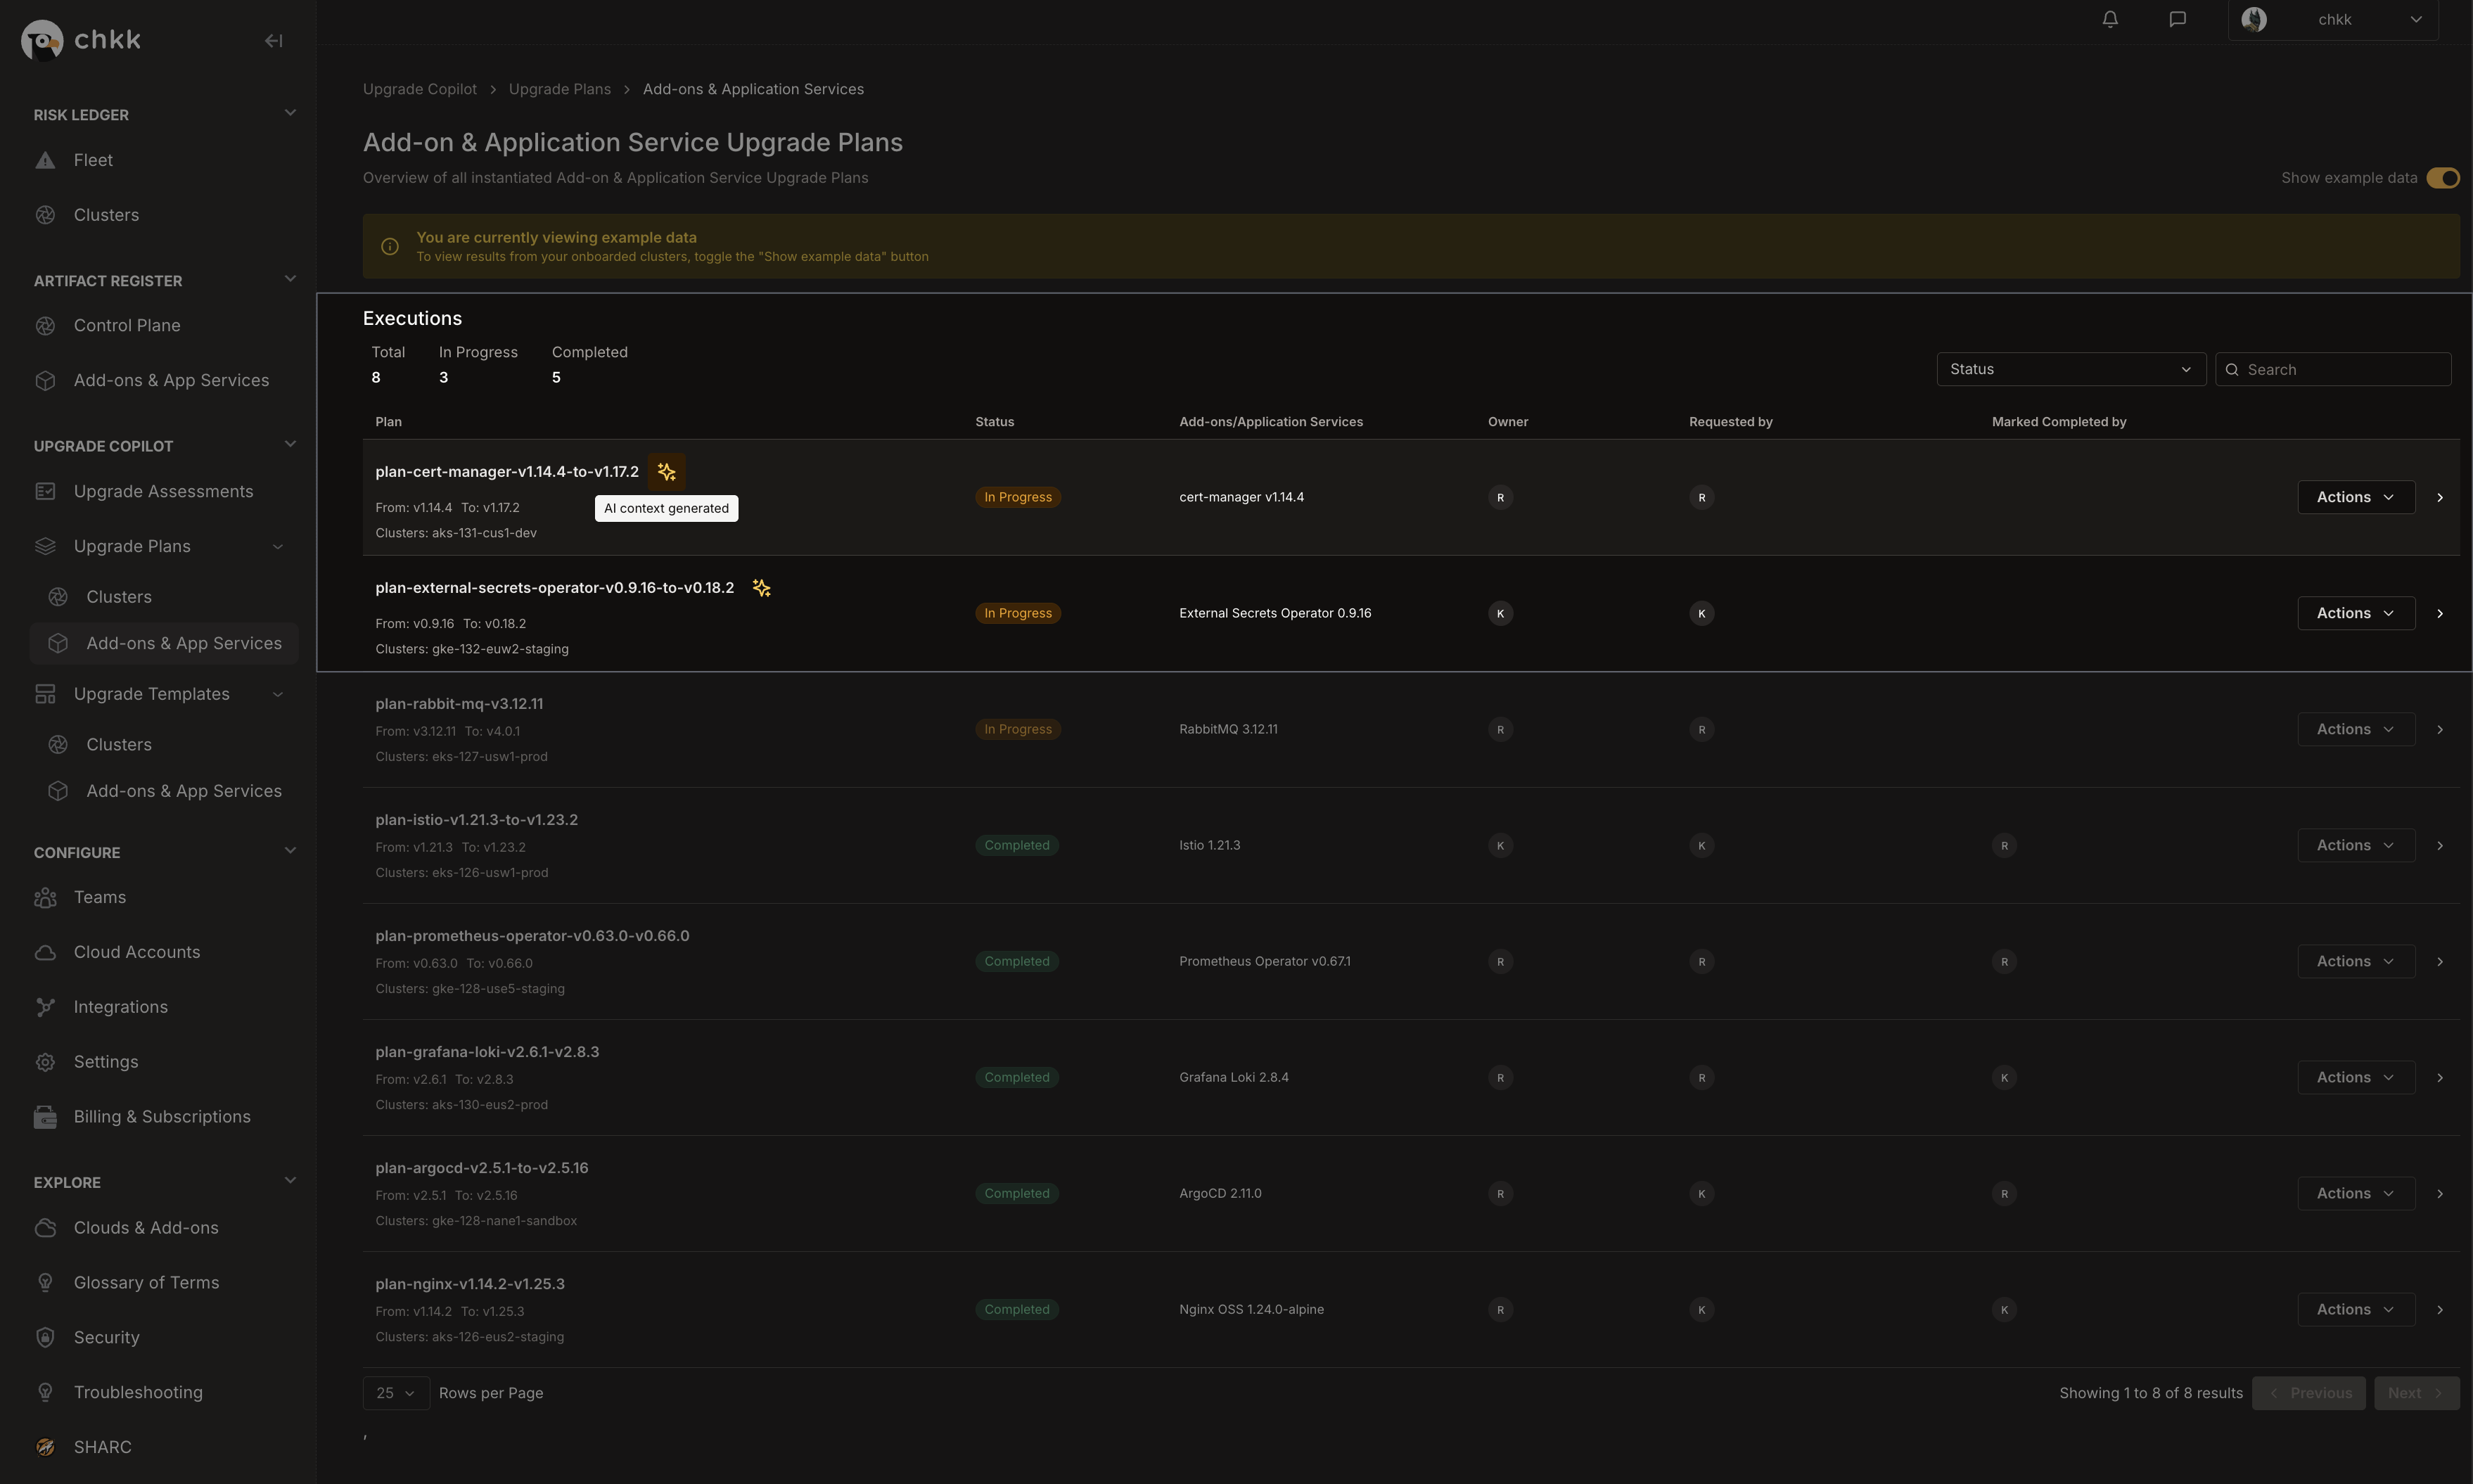
 5. In the table below, you will see a list of Projects **Example Upgrade Plans**.
6. Select any Upgrade Plan from the table that has the **AI Context Generated** badge, as shown in the image below.
The **AI Context Generated** badge indicates that these Upgrade Plans are supported by the **Chkk-Upgrade-Context-MCP Server**.
5. In the table below, you will see a list of Projects **Example Upgrade Plans**.
6. Select any Upgrade Plan from the table that has the **AI Context Generated** badge, as shown in the image below.
The **AI Context Generated** badge indicates that these Upgrade Plans are supported by the **Chkk-Upgrade-Context-MCP Server**.
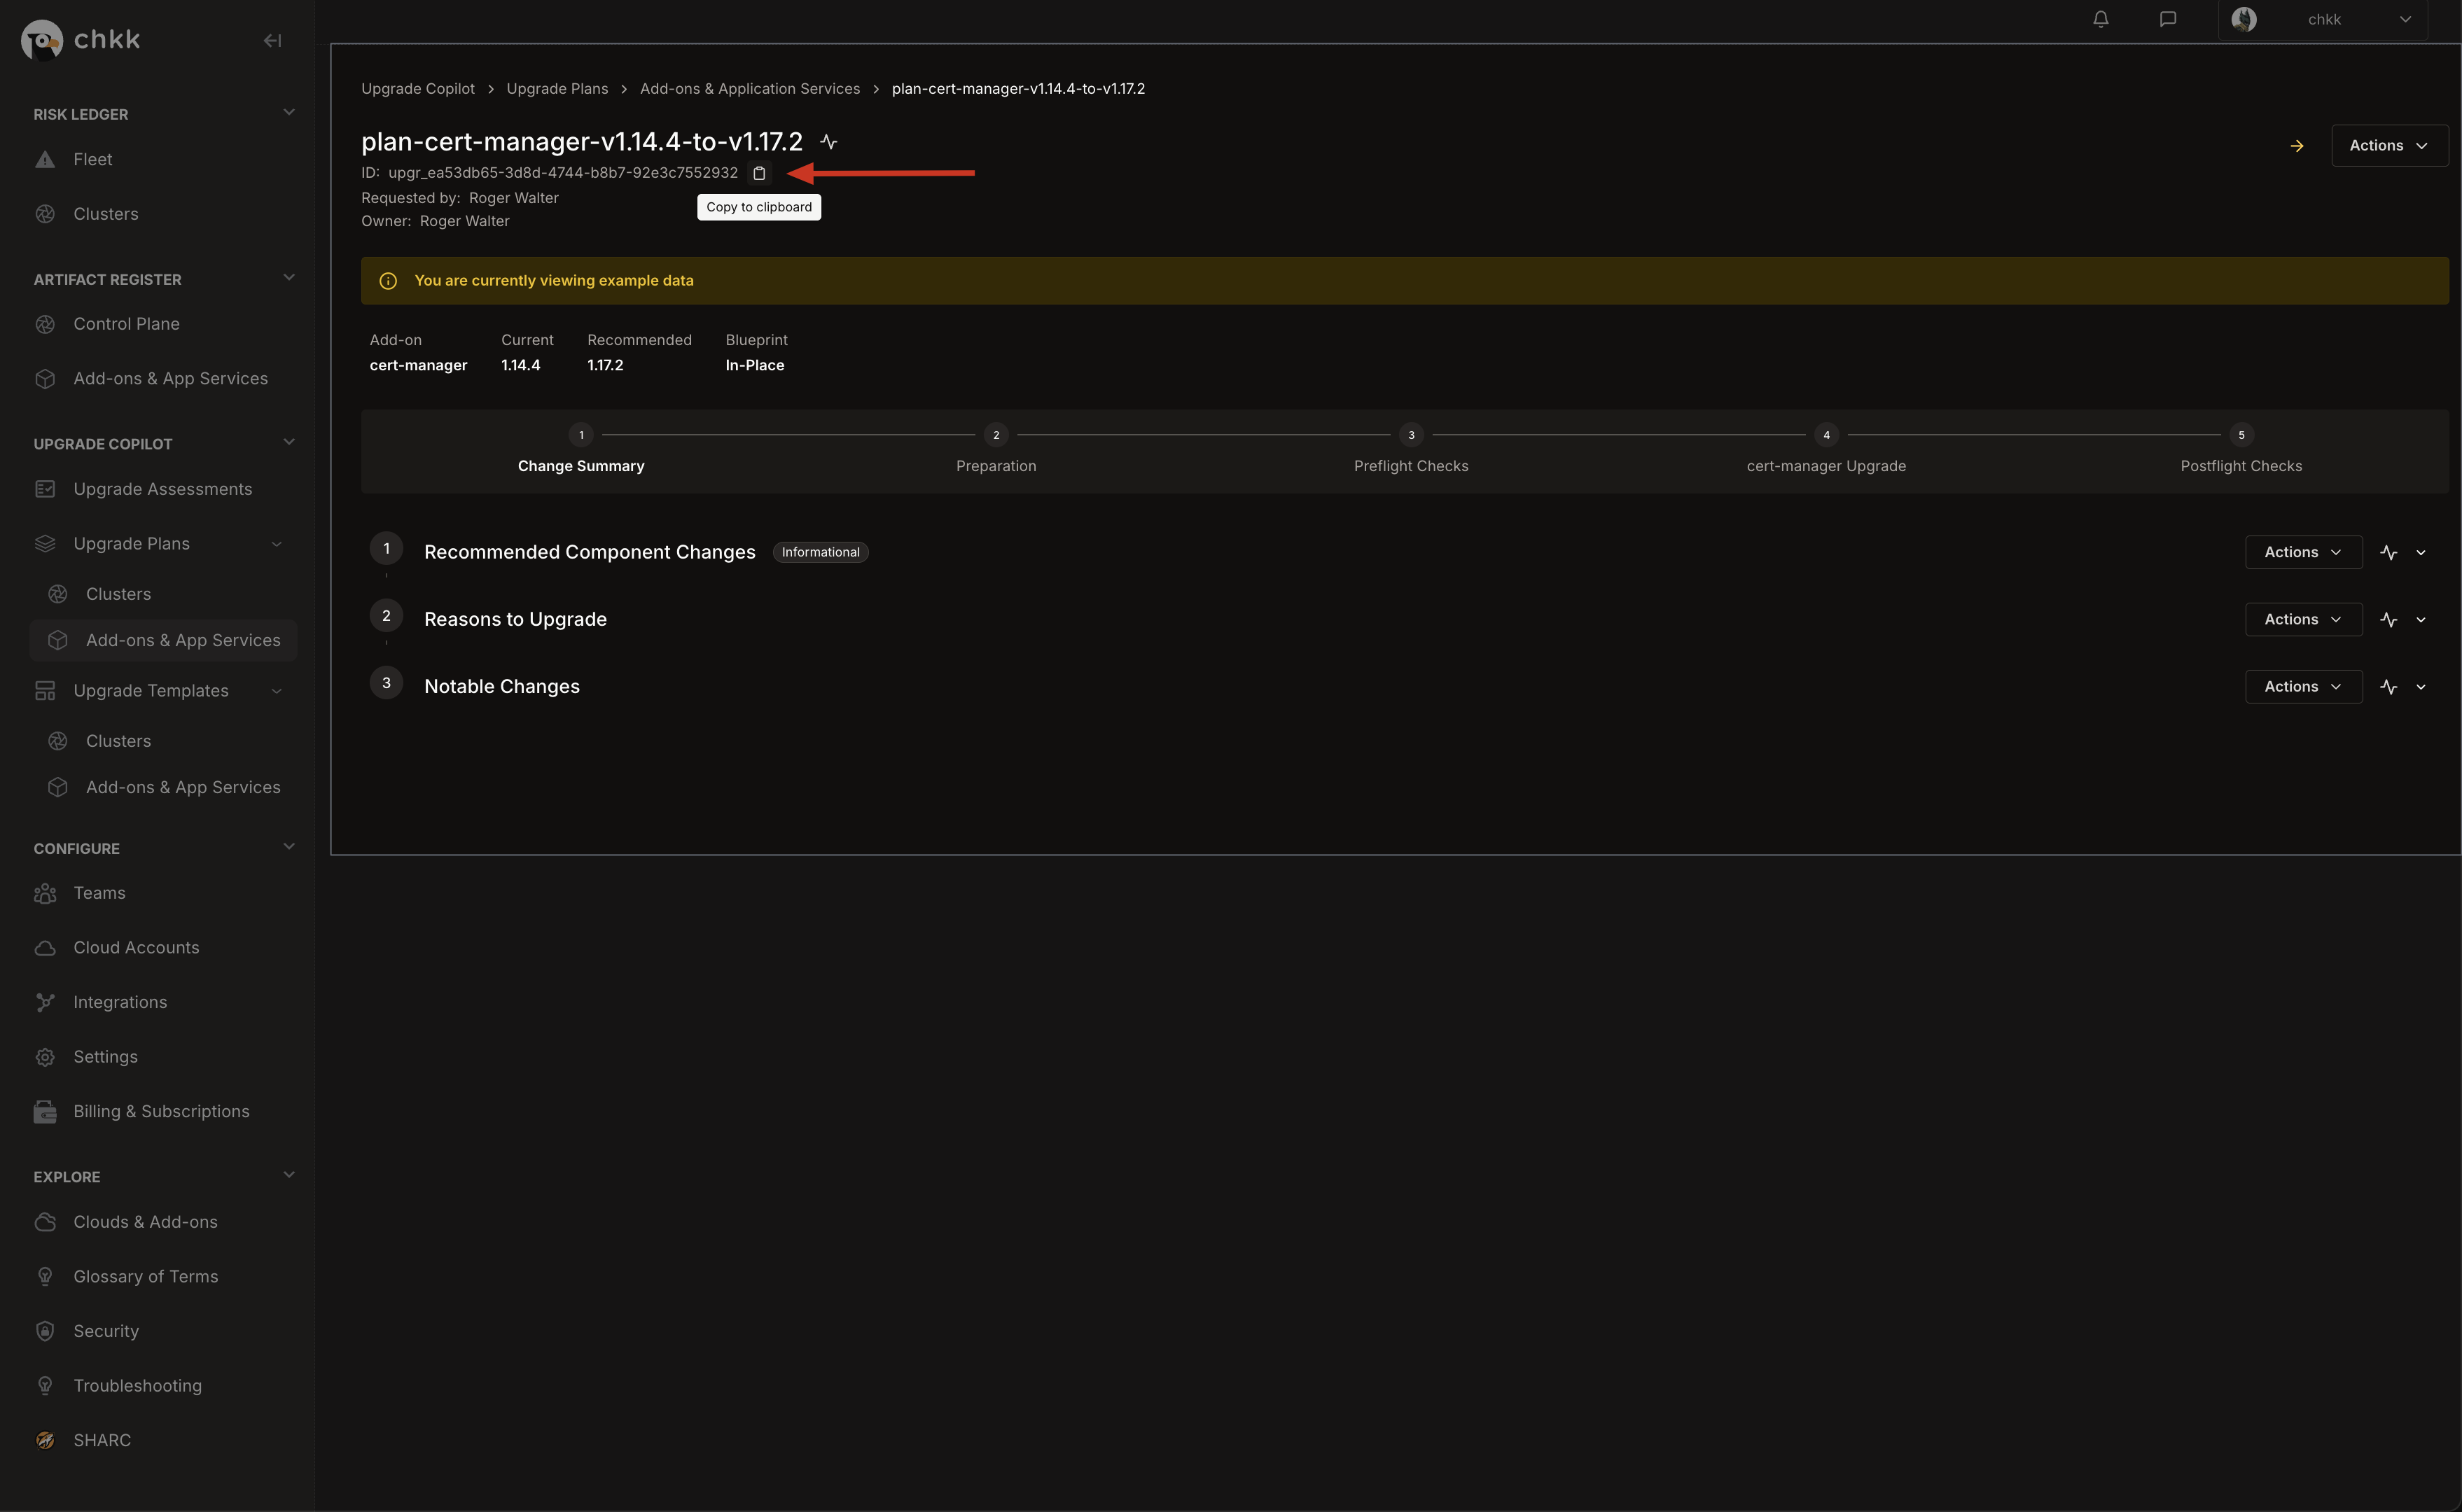
 7. At the top of the page, under the name of the Upgrade Plan, you will see the **Upgrade ID**.
8. Click the **clipboard** icon to copy the Upgrade ID to your clipboard.
7. At the top of the page, under the name of the Upgrade Plan, you will see the **Upgrade ID**.
8. Click the **clipboard** icon to copy the Upgrade ID to your clipboard.
 Paste and send the following Prompt in the Cursor chat:
You're in a K8s repo. Fetch "addon-upgrade-agent" from Chkk MCP and upgrade the package listed in the upgrade plan. Start by asking for the upgrade ID.
Your opening prompt is flexible, but it **must** explicitly instruct the agent to **fetch "addon-upgrade-agent" from Chkk MCP**.
**Agent Response:**
Paste and send the following Prompt in the Cursor chat:
You're in a K8s repo. Fetch "addon-upgrade-agent" from Chkk MCP and upgrade the package listed in the upgrade plan. Start by asking for the upgrade ID.
Your opening prompt is flexible, but it **must** explicitly instruct the agent to **fetch "addon-upgrade-agent" from Chkk MCP**.
**Agent Response:**
 Paste your **upgrade ID** (from your instantiated [Project Upgrade Plan](/resources/glossary#project-upgrade-plan)), for example:
upgr\_ea53db65-3d8d-4744-b8b7-92e3c7552932
**Agent Response:**
Paste your **upgrade ID** (from your instantiated [Project Upgrade Plan](/resources/glossary#project-upgrade-plan)), for example:
upgr\_ea53db65-3d8d-4744-b8b7-92e3c7552932
**Agent Response:**
 Cursor will fetch Upgrade Context, stage artifacts in a local **Scratchpad** (`.chkk/scratchpad/upgrade-agent/` in the current working directory),
apply targeted edits (`Chart.yaml`, `values.yaml`, minimal templates), and summarize the changes it has made.
**Agent Response:**
Cursor will fetch Upgrade Context, stage artifacts in a local **Scratchpad** (`.chkk/scratchpad/upgrade-agent/` in the current working directory),
apply targeted edits (`Chart.yaml`, `values.yaml`, minimal templates), and summarize the changes it has made.
**Agent Response:**
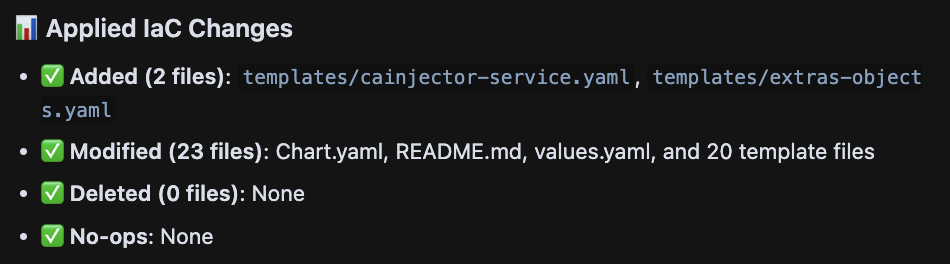 To ensure your model is not overwhelmed by the task scope, any modifications are processed in batches of 5 files at a time.
You can now review the changes made within each file, which you would have
otherwise would have had to do manually.
## Prerequisites
1. [Install Docker](https://docs.docker.com/get-docker/): Required to run the Chkk-Upgrade-Context-MCP Server.
2. [Install Claude Code](/resources/installation-guides/claude-code): Required to begin generating environment-aware pull requests.
3. A [Claude.ai](https://claude.ai/) (recommended) or [Anthropic Console](https://console.anthropic.com/) account
Agent Responses on this page are illustrative. Exact phrasing from your AI
model may vary depending on the model, settings, and repository context.
For the best experience, it is recommended to use the **claude-4-sonnet** model with the Chkk-Upgrade-Context-MCP Server.
Run the following command to clone the sample Chkk IaC repo:
```bash theme={"dark"}
git clone git@github.com:chkk-io/upgrade-playground.git && \
cd upgrade-playground
```
1. In the **Chkk Dashboard**, expand **Configure** on the left menu and click **Settings**.
2. Select the **Tokens** tab. Here you'll see a list of all your active tokens (if any), along with options to create new ones or revoke existing ones.
3. Click on the **clipboard** icon next to a token to copy it.
Install the `Chkk-Upgrade-Context-MCP` using the Claude Code CLI:
```bash theme={"dark"}
claude mcp add Chkk-Upgrade-Context-MCP --env CHKK_ACCESS_TOKEN="" -- docker run -i --rm -e CHKK_ACCESS_TOKEN public.ecr.aws/chkk/chkk-mcp-upgrade-context:latest
```
Replace `` with your Chkk Access Token.
Verify via CLI that the server is registered:
```bash theme={"dark"}
claude mcp get Chkk-Upgrade-Context-MCP
```
The command should return server details indicating it is installed and enabled.
To ensure your model is not overwhelmed by the task scope, any modifications are processed in batches of 5 files at a time.
You can now review the changes made within each file, which you would have
otherwise would have had to do manually.
## Prerequisites
1. [Install Docker](https://docs.docker.com/get-docker/): Required to run the Chkk-Upgrade-Context-MCP Server.
2. [Install Claude Code](/resources/installation-guides/claude-code): Required to begin generating environment-aware pull requests.
3. A [Claude.ai](https://claude.ai/) (recommended) or [Anthropic Console](https://console.anthropic.com/) account
Agent Responses on this page are illustrative. Exact phrasing from your AI
model may vary depending on the model, settings, and repository context.
For the best experience, it is recommended to use the **claude-4-sonnet** model with the Chkk-Upgrade-Context-MCP Server.
Run the following command to clone the sample Chkk IaC repo:
```bash theme={"dark"}
git clone git@github.com:chkk-io/upgrade-playground.git && \
cd upgrade-playground
```
1. In the **Chkk Dashboard**, expand **Configure** on the left menu and click **Settings**.
2. Select the **Tokens** tab. Here you'll see a list of all your active tokens (if any), along with options to create new ones or revoke existing ones.
3. Click on the **clipboard** icon next to a token to copy it.
Install the `Chkk-Upgrade-Context-MCP` using the Claude Code CLI:
```bash theme={"dark"}
claude mcp add Chkk-Upgrade-Context-MCP --env CHKK_ACCESS_TOKEN="" -- docker run -i --rm -e CHKK_ACCESS_TOKEN public.ecr.aws/chkk/chkk-mcp-upgrade-context:latest
```
Replace `` with your Chkk Access Token.
Verify via CLI that the server is registered:
```bash theme={"dark"}
claude mcp get Chkk-Upgrade-Context-MCP
```
The command should return server details indicating it is installed and enabled.
 1. In the **left-hand column** of the **Chkk Dashboard**, expand **Upgrade Copilot**.
2. Under **Upgrade Plans** select **Add-on & App Services**.
3. On the **Middle Right** corner of the page, enable the **Show Example Data** toggle, as shown in the image below.
4. This will switch the view to only show example data and displays a confirmation banner.
5. In the table below, you will see a list of Projects **Example Upgrade Plans**.
6. Select any Upgrade Plan from the table that has the **AI Context Generated** badge, as shown in the image below.
The **AI Context Generated** badge indicates that these Upgrade Plans are supported by the **Chkk-Upgrade-Context-MCP Server**.
7. At the top of the page, under the name of the Upgrade Plan, you will see the **Upgrade ID**.
8. Click the **clipboard** icon to copy the Upgrade ID to your clipboard.
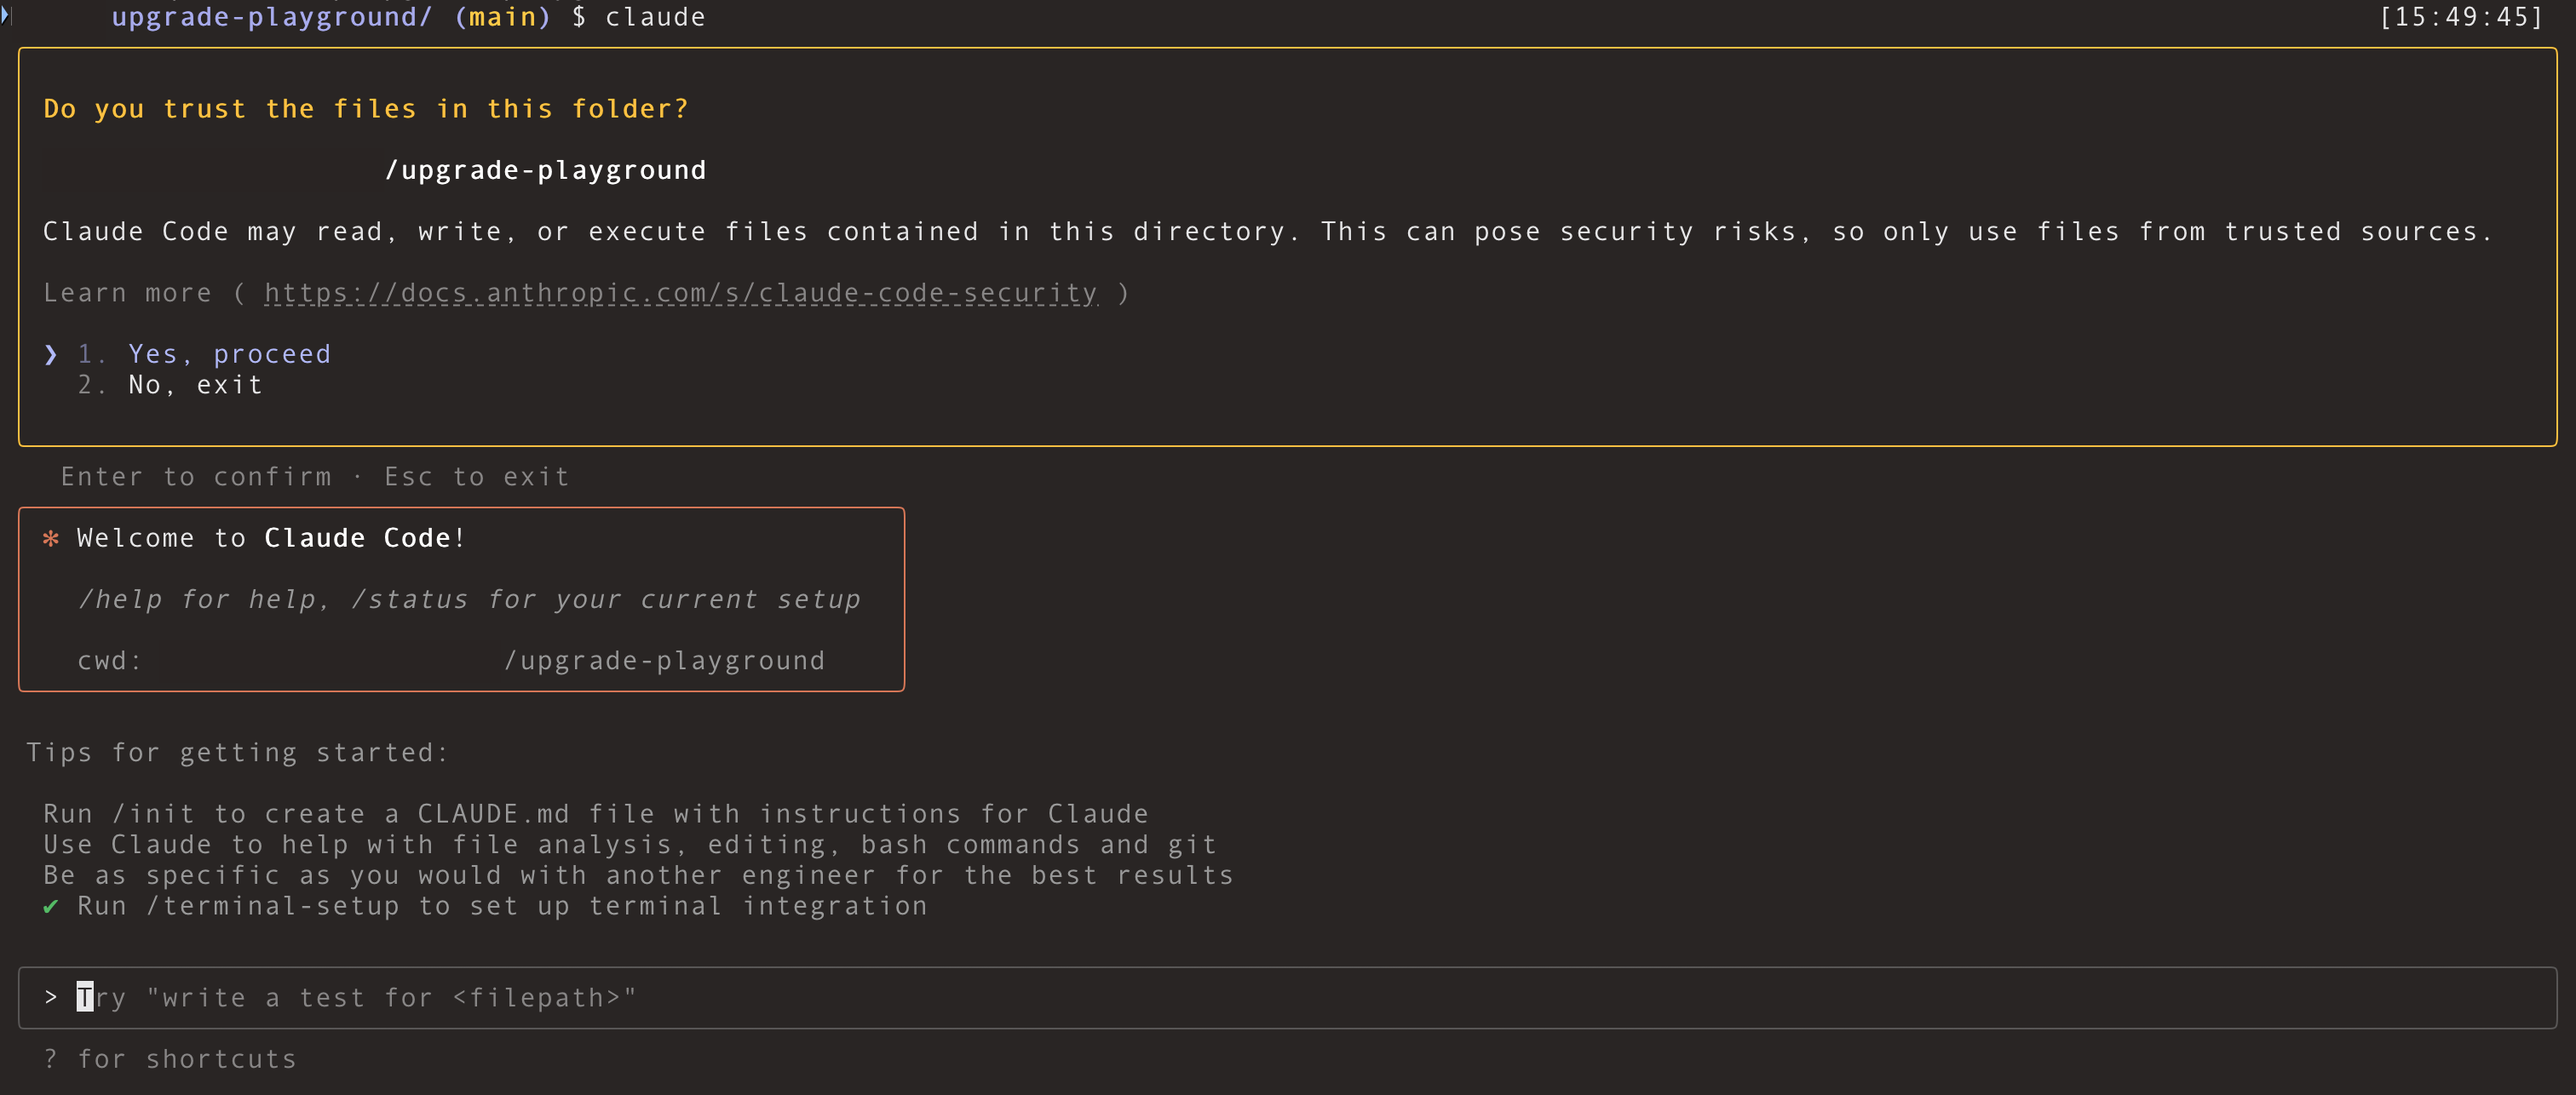
From inside the `upgrade-playground` directory, start Claude Code.
```bash theme={"dark"}
claude
```
1. In the **left-hand column** of the **Chkk Dashboard**, expand **Upgrade Copilot**.
2. Under **Upgrade Plans** select **Add-on & App Services**.
3. On the **Middle Right** corner of the page, enable the **Show Example Data** toggle, as shown in the image below.
4. This will switch the view to only show example data and displays a confirmation banner.
5. In the table below, you will see a list of Projects **Example Upgrade Plans**.
6. Select any Upgrade Plan from the table that has the **AI Context Generated** badge, as shown in the image below.
The **AI Context Generated** badge indicates that these Upgrade Plans are supported by the **Chkk-Upgrade-Context-MCP Server**.
7. At the top of the page, under the name of the Upgrade Plan, you will see the **Upgrade ID**.
8. Click the **clipboard** icon to copy the Upgrade ID to your clipboard.
From inside the `upgrade-playground` directory, start Claude Code.
```bash theme={"dark"}
claude
```
 Open a chat in Claude Code and send:
You're in a K8s repo. Fetch "addon-upgrade-agent" from Chkk MCP and upgrade the package listed in the upgrade plan. Start by asking for the upgrade ID.
Your opening prompt is flexible, but it **must** explicitly instruct the assistant to **fetch "addon-upgrade-agent" from Chkk MCP**.
**Agent Response:**
Open a chat in Claude Code and send:
You're in a K8s repo. Fetch "addon-upgrade-agent" from Chkk MCP and upgrade the package listed in the upgrade plan. Start by asking for the upgrade ID.
Your opening prompt is flexible, but it **must** explicitly instruct the assistant to **fetch "addon-upgrade-agent" from Chkk MCP**.
**Agent Response:**
 Paste your **upgrade ID** (from your instantiated [Project Upgrade Plan](/resources/glossary#project-upgrade-plan)), for example:
upgr\_ea53db65-3d8d-4744-b8b7-92e3c7552932
**Agent Response:**
Paste your **upgrade ID** (from your instantiated [Project Upgrade Plan](/resources/glossary#project-upgrade-plan)), for example:
upgr\_ea53db65-3d8d-4744-b8b7-92e3c7552932
**Agent Response:**
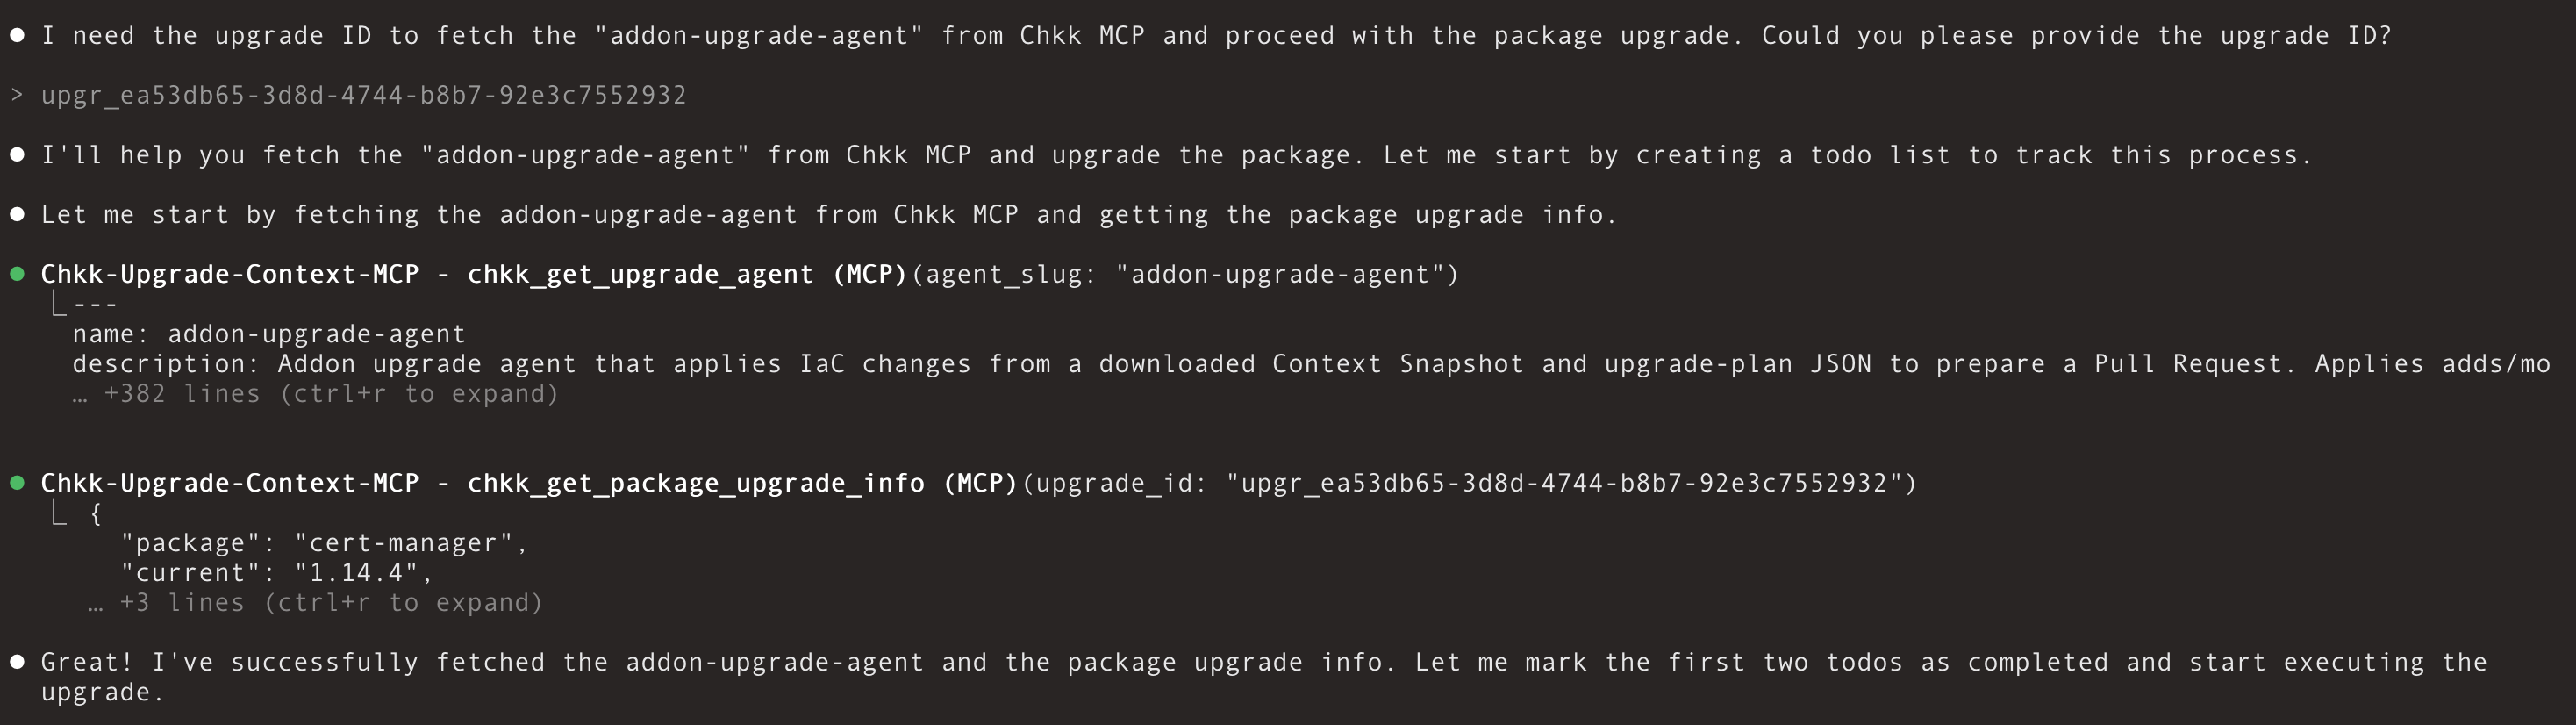 The assistant will fetch Upgrade Context, stage artifacts in a local **Scratchpad** (`.chkk/scratchpad/upgrade-agent/` in the current working directory),
apply targeted edits (`Chart.yaml`, `values.yaml`, minimal templates), and summarize the changes it has made.
**Agent Response:**
The assistant will fetch Upgrade Context, stage artifacts in a local **Scratchpad** (`.chkk/scratchpad/upgrade-agent/` in the current working directory),
apply targeted edits (`Chart.yaml`, `values.yaml`, minimal templates), and summarize the changes it has made.
**Agent Response:**
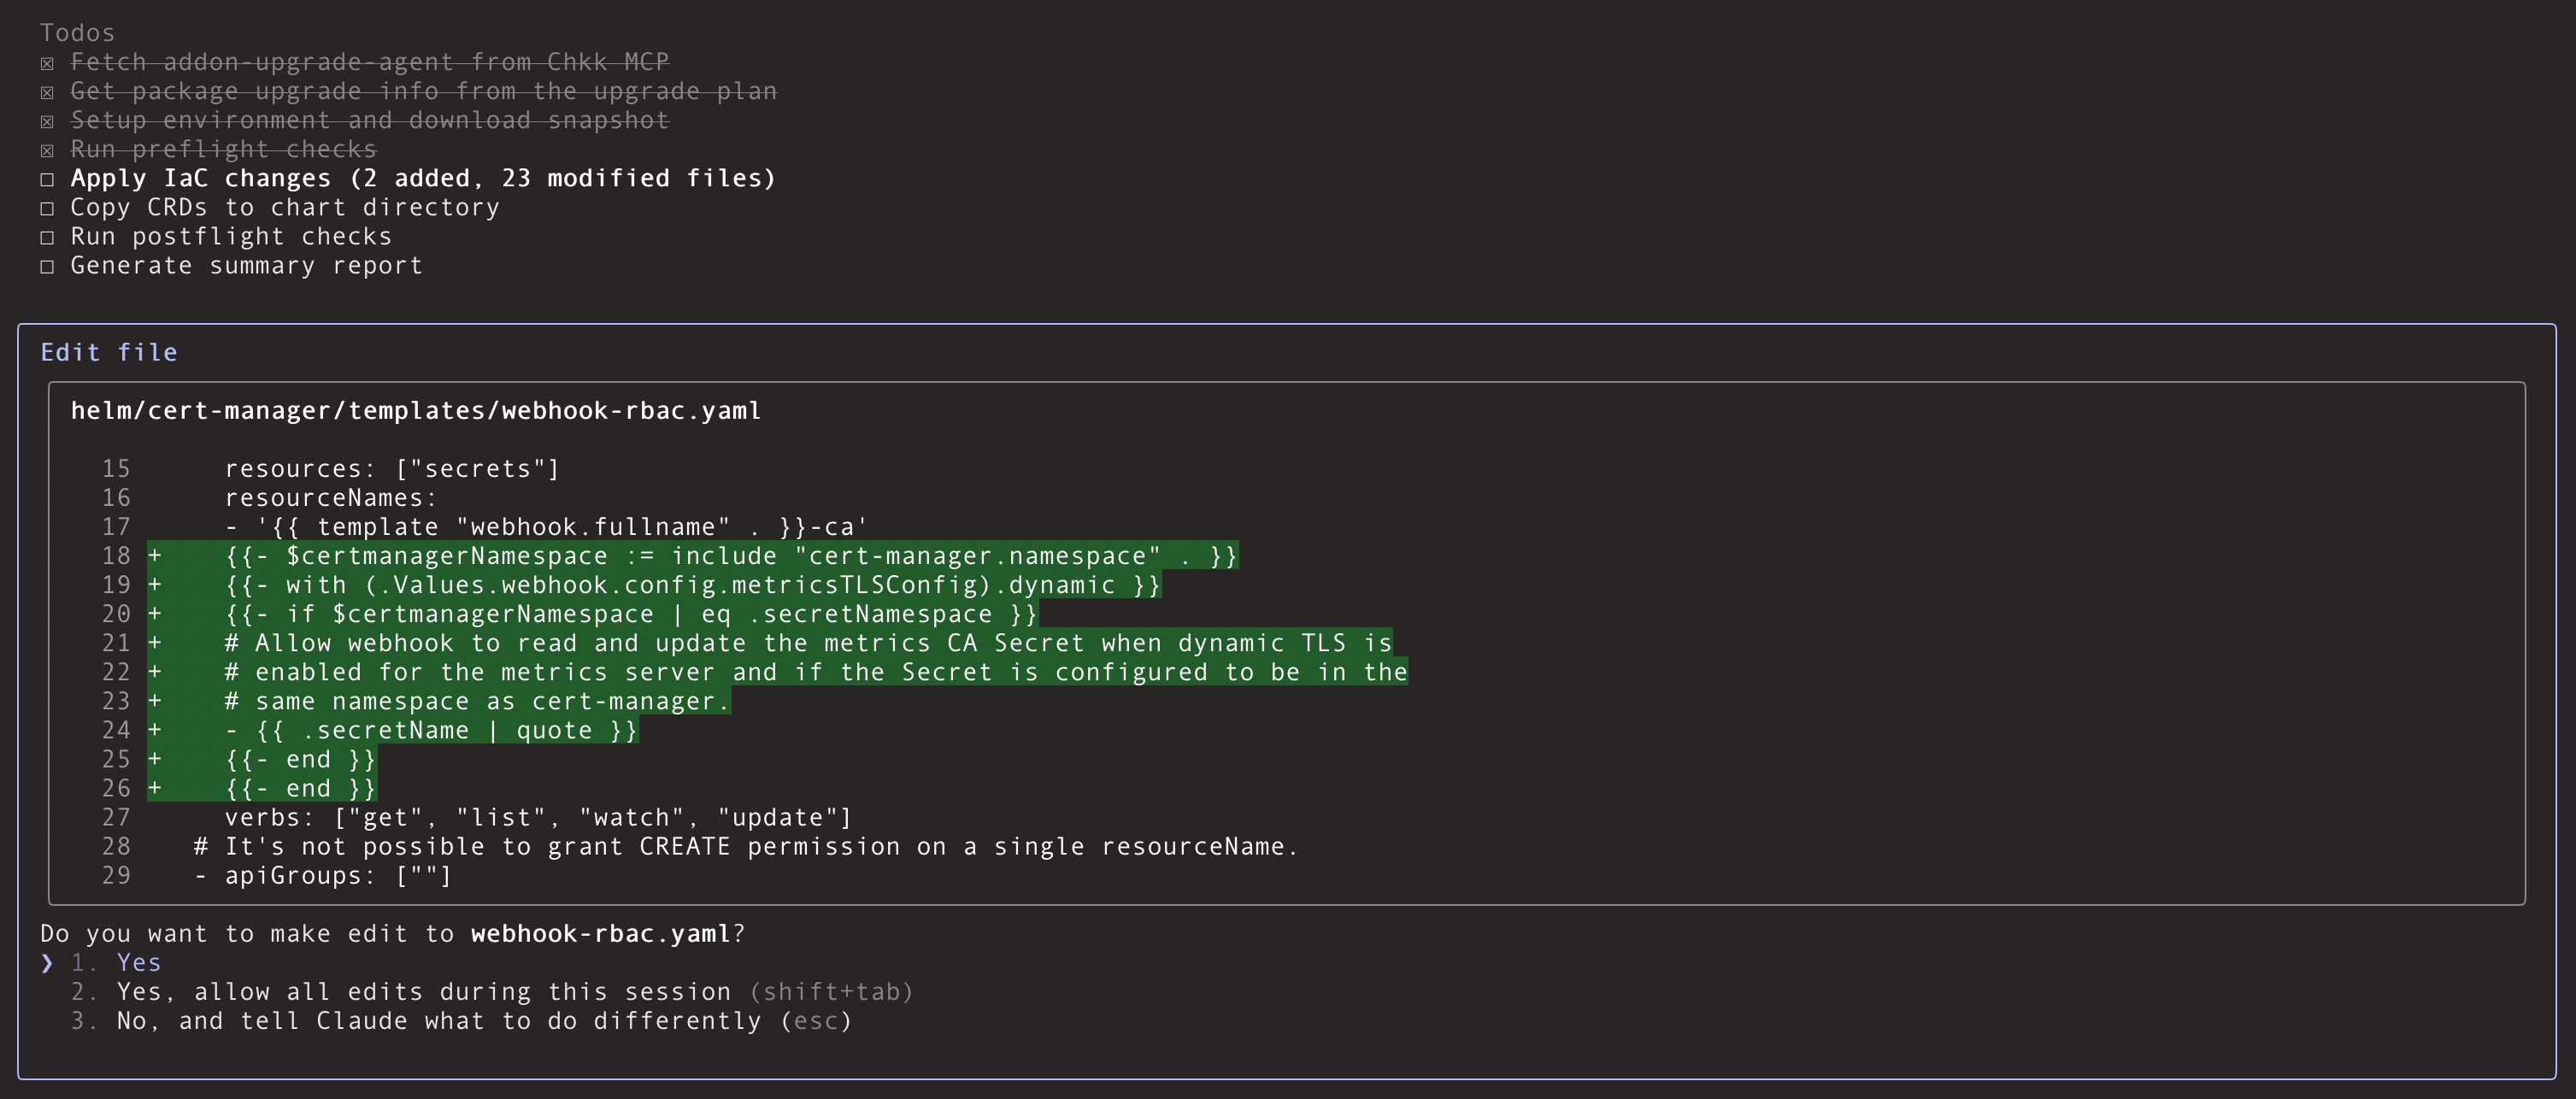
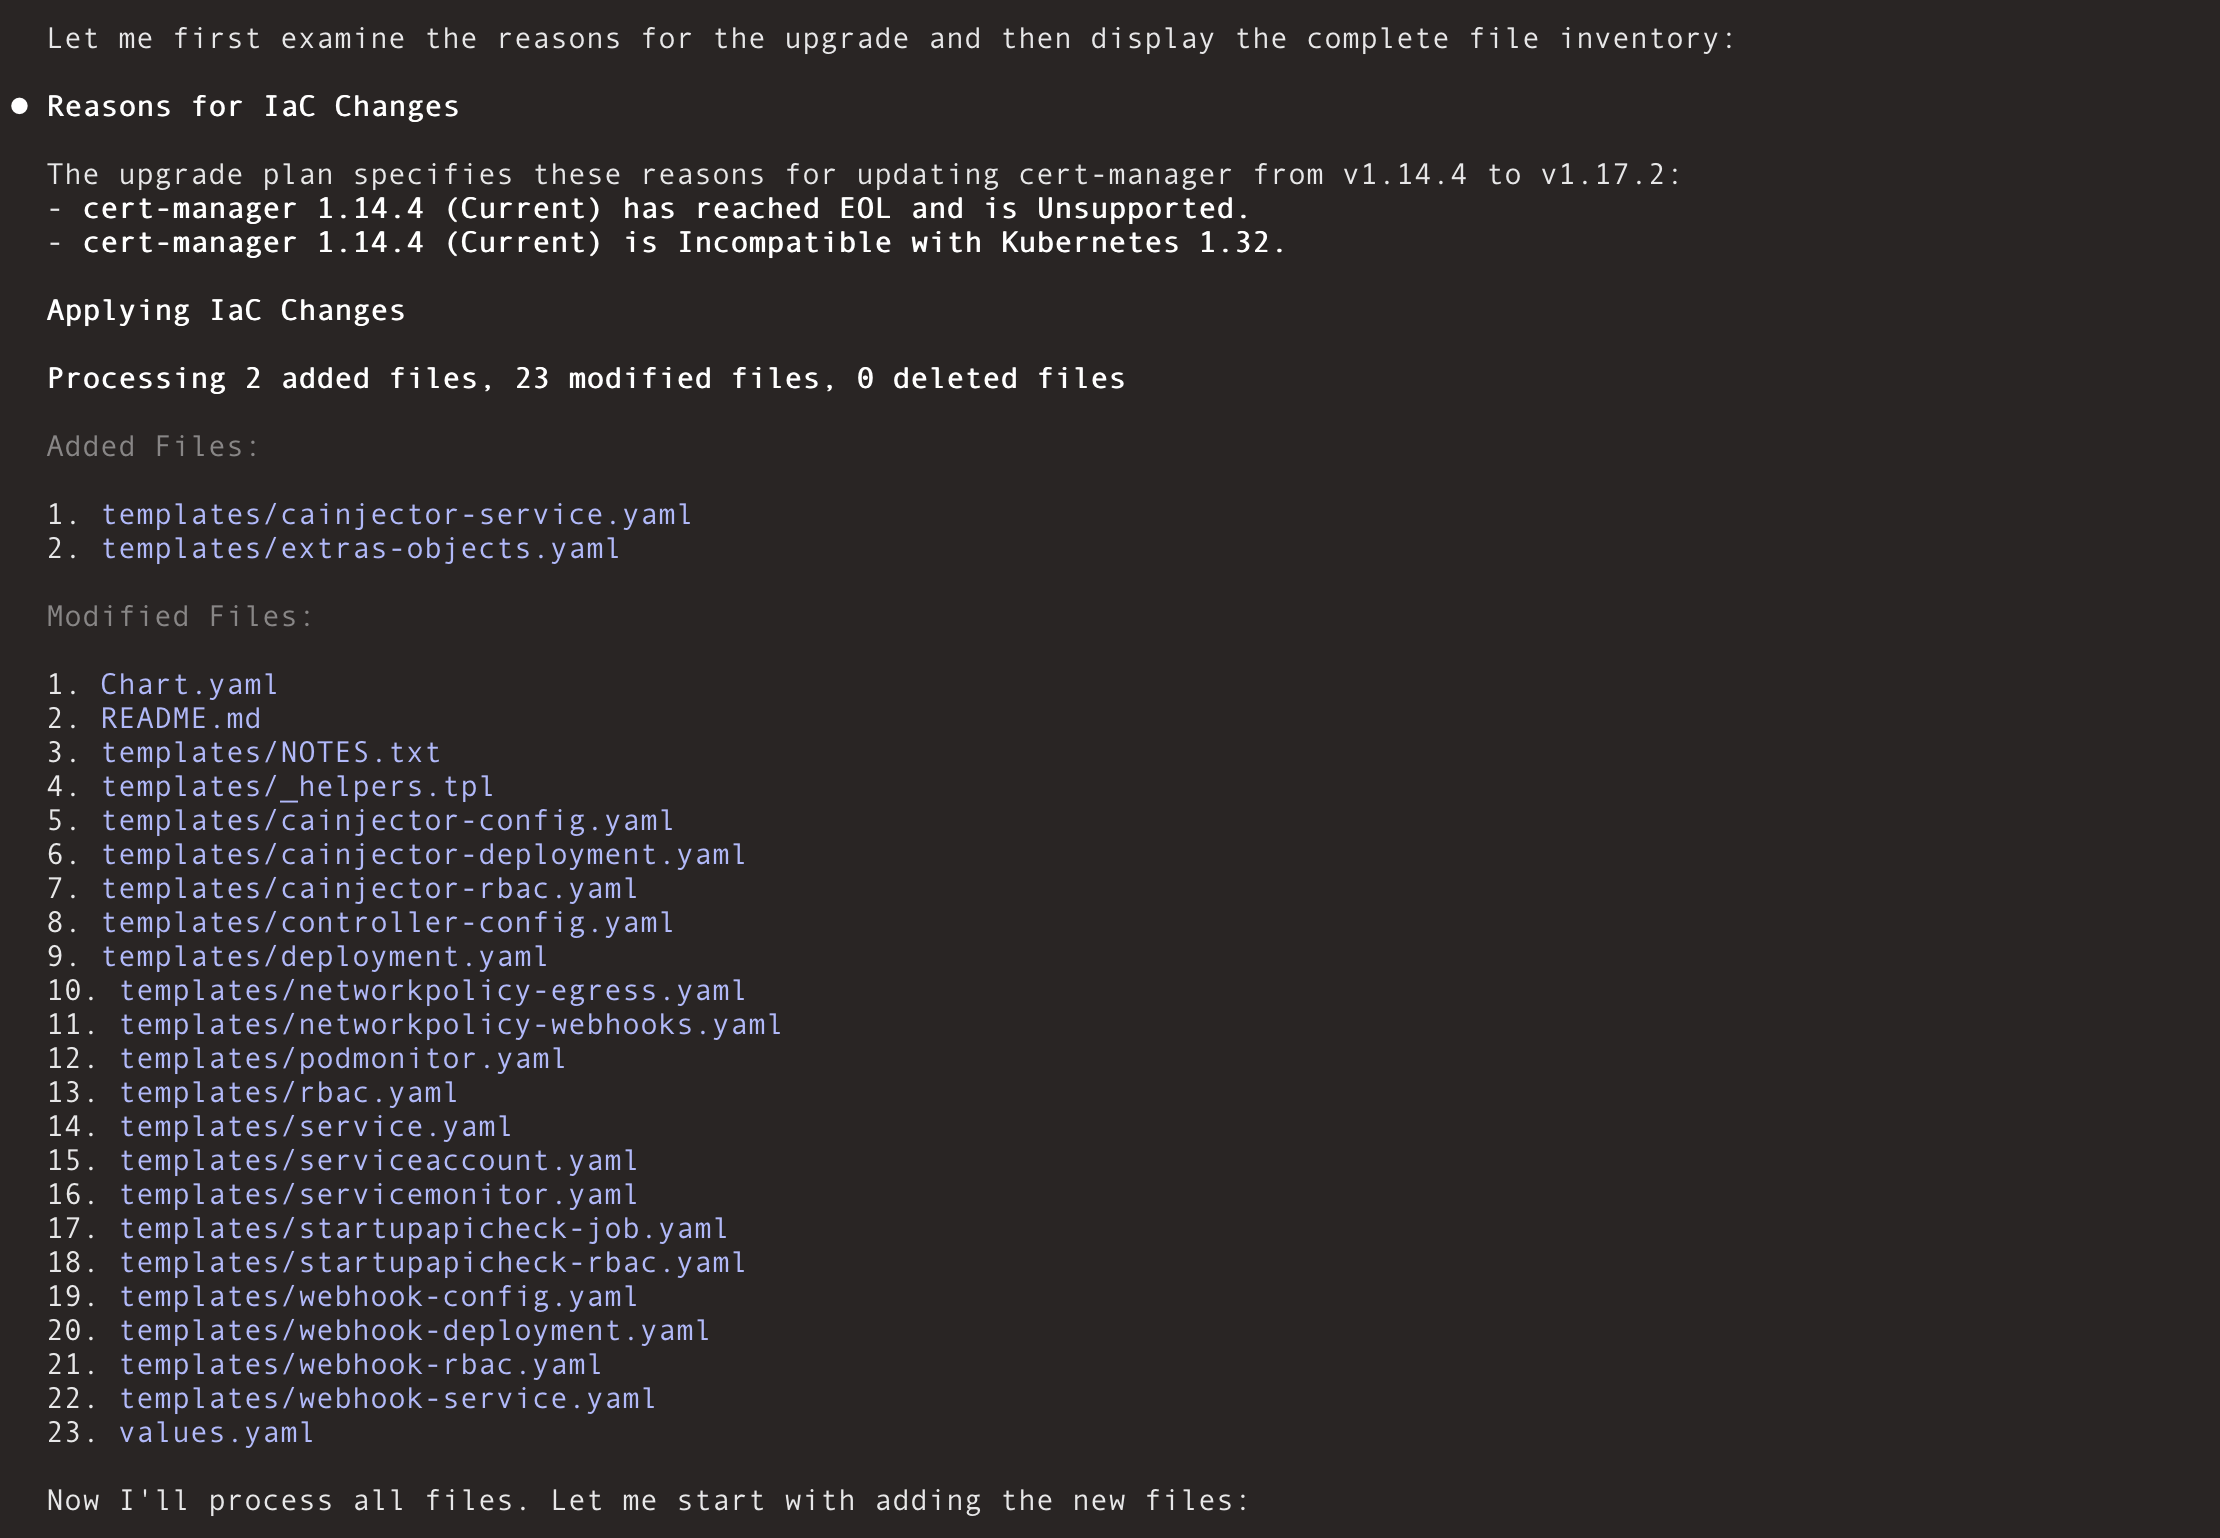 To ensure your model is not overwhelmed by the task scope, any modifications are processed in batches of 5 files at a time.
You can now review the changes made within each file, which you would have
otherwise would have had to do manually.
**Agent Response:**
To ensure your model is not overwhelmed by the task scope, any modifications are processed in batches of 5 files at a time.
You can now review the changes made within each file, which you would have
otherwise would have had to do manually.
**Agent Response:**
 Learn more in the [Upgrade Agent guide](/ai/upgrade-agent).
***
### Need Help?
Email us at **[support@chkk.io](mailto:support@chkk.io)** for assistance.
Learn more in the [Upgrade Agent guide](/ai/upgrade-agent).
***
### Need Help?
Email us at **[support@chkk.io](mailto:support@chkk.io)** for assistance.